One of the greatest new features in HawkSoft, currently being rolled out to agencies over the coming weeks in version 5.1, is HawkLink for Google Chrome. You might be familiar with earlier versions of the HawkLink browser tool, a data mapping and form fill tool that drastically reduces manual data entry by autofilling client and policy data from HawkSoft to carrier sites. So what’s different about HawkLink for Google Chrome?
The buzz about the NEW HawkLink for Google Chrome
This iteration of HawkLink is an extension you download and plug into Google Chrome, the most commonly used web browser in the world. This allows deeper data mapping functionality on more websites than ever—any website you can access in a Chrome browser. That means you can quickly flood data from HawkSoft to virtually any website for:
- Quoting
- Policy servicing
- Digital payment
- Premium finance
- and more!
Another huge new benefit of HawkLink for Google Chrome is that it includes crowd-sourced mappings, so many of the most common carrier and insurance websites are already mapped for you!
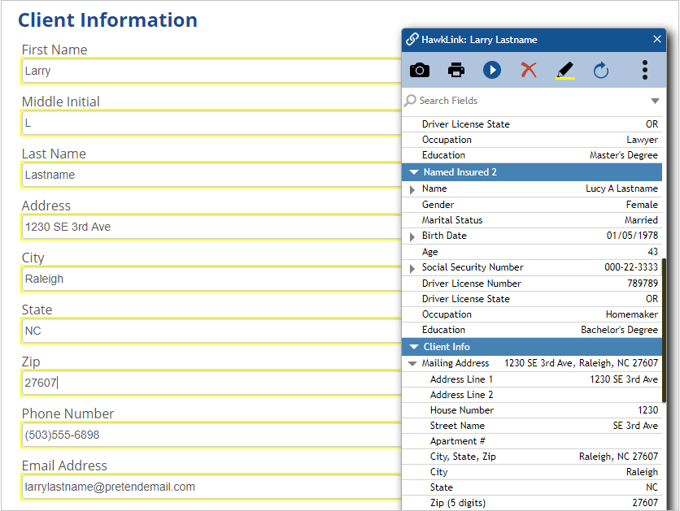
The HawkLink mapping tool autofills mapped data into a website
You can learn more about this tool on our HawkLink for Google Chrome page, but we want to show you some of the most exciting features of this new and improved tool, and give you some tips and tricks for using it!
- Tips for setup
- Set websites to open in Chrome
- Optimize carriers and company setup for HawkLink
- Website shortcut buttons
- Tips for using mappings
- Use crowd-sourced mappings
- Create new mappings
- Share mappings with others in your agency
- Tips for quoting & other workflows
- Open multiple carrier websites
- Link to a different client or policy
- Vehicles & drivers
- Capture & Print buttons
- Receipt values
- Fixed Value & User Input
Tips for setup
Once you install the HawkLink Chrome extension (you’ll be prompted to do this the first time you click the Website button in the CMS toolbar after you’ve updated to version 5.1), you’ll be able to use the HawkLink mapping tool within websites in Chrome. But there are a few settings you should tweak to make sure HawkLink works as efficiently as possible with your HawkSoft setup. Get full details on HawkLink setup in our HawkLink for Google Chrome help article.
Set websites to open in Chrome
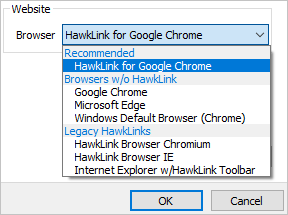
Because HawkLink for Google Chrome works specifically within the Chrome browser, you’ll need to set HawkSoft to open websites in Chrome. You can do this by selecting User Preferences in the dropdown underneath your name on the CMS toolbar. In the Website section, select HawkLink for Google Chrome in the Browser dropdown. This will ensure any websites you open through HawkSoft will open in Chrome, allowing you to use the HawkLink mapping tool to map and flood data.
Optimize carrier and company setup for HawkLink
You should also make sure that your carriers and other companies in HawkSoft have the appropriate settings selected under Policy/Company Setup. This will allow you to open a company's website with HawkLink by clicking the Website button in the CMS toolbar or by using the Quote feature in HawkSoft’s Action Menu. See our Policy/Company Setup help article for more details on carrier setup.
Needed settings in Policy/Company Setup:
- Website URL must be entered
- Quote checkbox should be selected
- Browser dropdown should be set to User Preference (Default), unless you know the website will not work in Google Chrome (in that case you can set that website to open with a legacy version of HawkLink for a different browser)
Website shortcut buttons
You can also add shortcut buttons on your CMS toolbar, Tools Menu, or Quick launch panel to open general websites with HawkLink that aren't specific to a client or policy (such as a VIN search website or real estate lookup website). You can set these up by going to Settings > Computer Specific Settings and selecting External Tools. See our External Tools help article for more details.
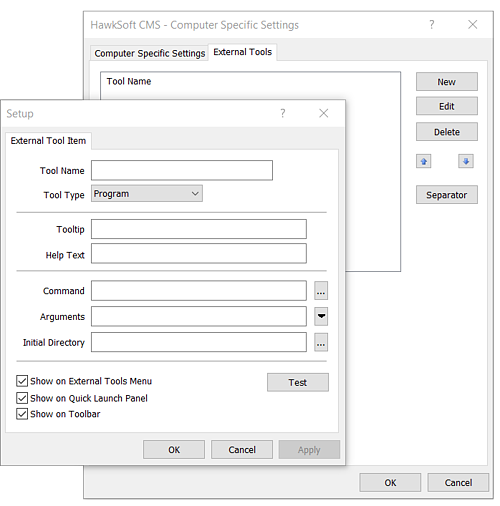
Menu for creating an External Tool shortcut to open a website with HawkLink from outside a client or policy
Tips for using mappings
HawkLink works by saving website “mappings,” or templates that tell HawkLink which HawkSoft data corresponds with which field on a website. HawkLink for Google Chrome allows you to use crowd-sourced mappings, create your own customized mappings, and share mappings with others in your agency or with all of HawkSoft. Here’s how it works!
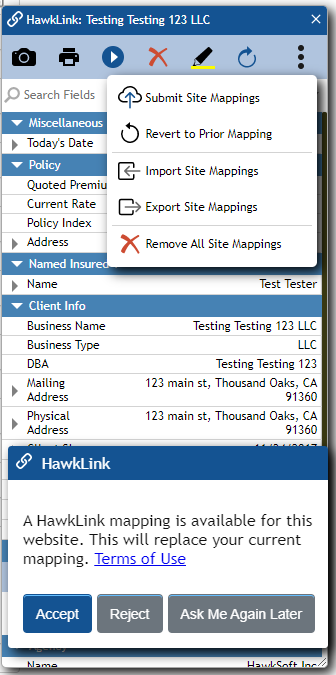
Use crowd-sourced mappings
One of the most exciting things about HawkLink for Google Chrome is that it includes crowd-sourced mappings for the most commonly used websites in the industry, which have been submitted by insurance carriers, financial services vendors, and trusted HawkSoft agents.
That means there are many websites you won’t need to map yourself! You can accept the default mapping for a website, or customize it and save your own version. See some of the top mapped websites here.
Create new mappings
For websites that don’t already have a suggested mapping, it’s quick and easy to create a new mapping by selecting each field and double-clicking the corresponding HawkSoft data field in the HawkLink mapping tool. The mapping tool lets you easily remove field mappings, highlight mapped fields, flood data, or check for a shared mapping. Once you’ve mapped a new website, you can even submit your mapping to HawkSoft to be reviewed and added to our library of mappings available to all agencies.
Share mappings with others in your agency
Because HawkLink for Google Chrome is a Chrome extension, your mappings are saved in your individual Chrome settings rather than in HawkSoft, meaning new or customized mappings you create won’t be automatically shared with other users within your agency. However, the Export Site Mappings feature exports your mappings as files that can be easily sent to others at the agency. They can simply select Import Site Mappings and drag the mapping file over to upload it into HawkLink.
Tips for quoting & other workflows
HawkLink helps with workflows for quoting, payment, and more. Here are some tips to help you get the most out of HawkLink’s features when using it for quoting and other common workflows.
Open multiple carrier websites
When quoting, if you’re looking at a single carrier you can use the Website button to open the carrier website, and then use HawkLink to flood the client data to produce the quote. If you want to quote with several websites at once, you can select Quote/Export in the Action menu. This will allow you to select the carriers you want to quote with, and HawkLink will open each website in a different tab. From here, you can use HawkLink to autofill the data and quickly get quotes from each carrier.
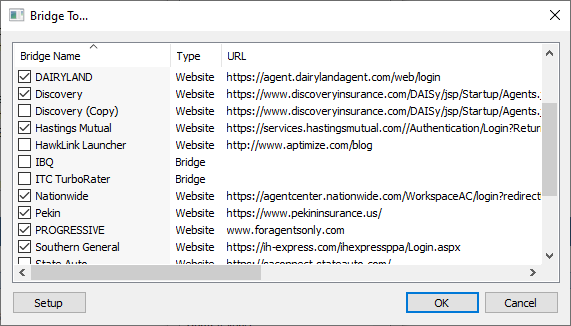
Dialog for selecting multiple carrier websites to open with HawkSoft when quoting
Link to a different client or policy
It’s easy to switch which client or policy you’re flooding data from in HawkLink. Just click the HawkLink symbol in the top right corner of your Chrome browser and select Link to a different client or policy to see which policies you have open in HawkSoft and select the one you need.
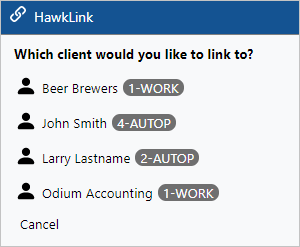
Options for linking to open clients in HawkLink
Vehicles & drivers
You can even tell HawkLink to drill down to specific vehicles and drivers. In the mapping tool, just scroll to the Driver or Vehicle section and select the one you’d like to map. It’s as easy as that!
Capture & Print buttons
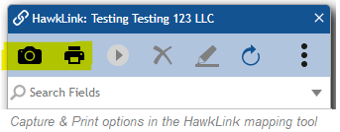
Once HawkLink has flooded the data into a website, you can capture a screenshot of the page, which might be helpful for showing full quote details, providing proof of payment, etc. You can do this in the HawkLink mapping tool by selecting either the camera icon to capture only the information that's currently visible on your screen, or the print icon to capture the entire webpage. Both buttons will open HawkSoft's Virtual Printer, where you can easily send the image as a PDF to a client, categorize and attach it to the client file, or add it to a user’s Documents for Review list. Learn more about the Virtual Printer and its features in our Virtual Printer help article.
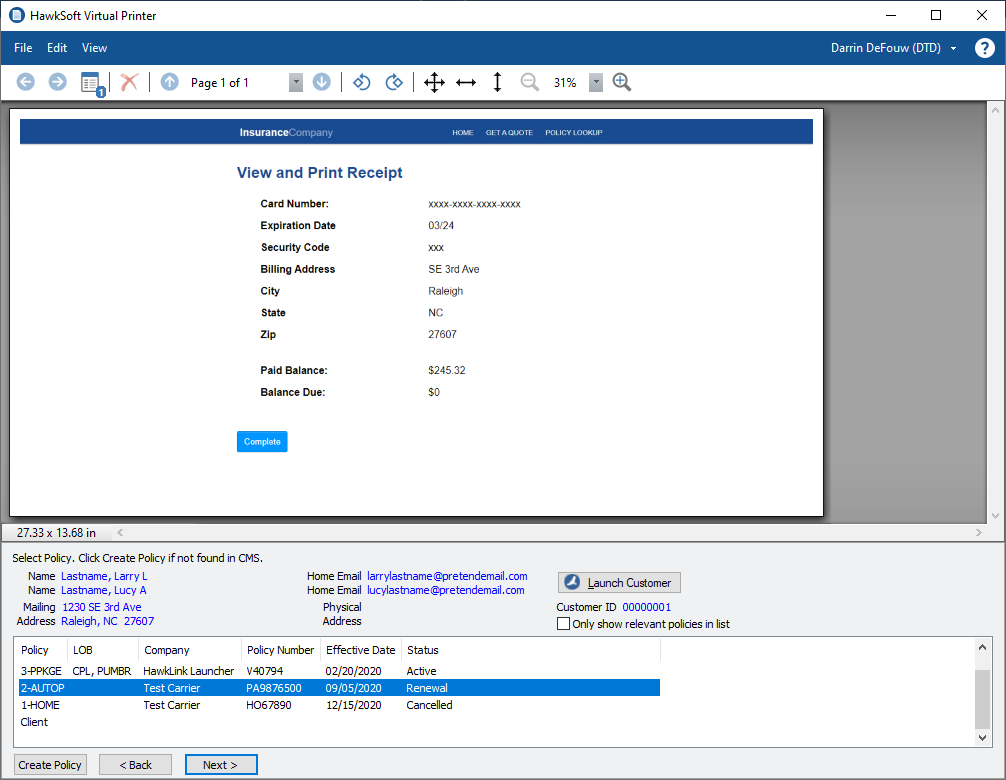
Virtual Printer options using the Capture or Print options in the HawkLink mapping tool
Receipt values
HawkLink can also save and map payment amounts from receipts. When you're creating a receipt in HawkSoft, just check the Upload Payment box. This will automatically open the carrier website with HawkLink once you click OK, and you'll see Payment Amount as an available data field in the mapping tool, as shown below.
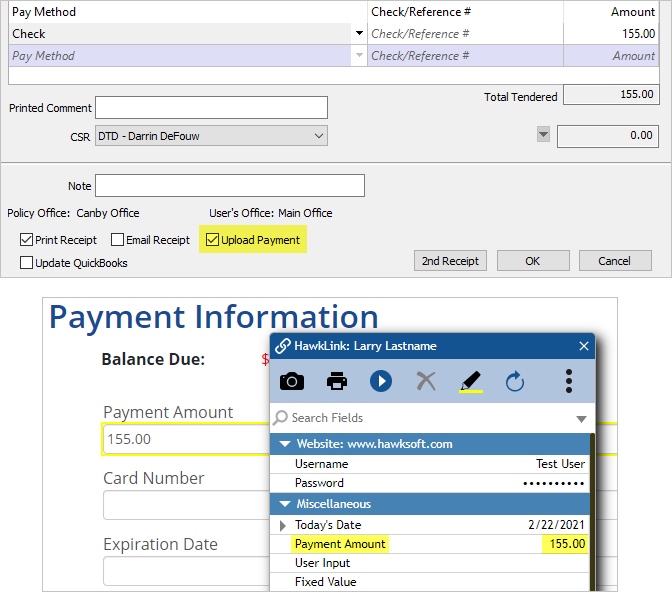 You can upload payment amount when creating a receipt (above) to make it available in the HawkLink mapping tool (below)
Fixed Value & User Input
There might be fields on some websites that aren’t conducive to mapping. If there’s a field that doesn’t correspond to any data stored in CMS, for example, but you know what data needs to be input there, you can still save that data in HawkLink. Just double-click Fixed Value in the Miscellaneous section of the mapping tool and enter the data you want to display in that field. Next time you open the website, the data you entered will automatically display there.
You can also tell HawkSoft to show you a prompt every time for a selected field. Double-click User Input in the Miscellaneous section of the mapping tool, and enter the prompt you want to display (for example, the County for an Auto quote).
Get started with HawkLink
HawkLink for Google Chrome can be a huge time-saving tool for your agency, reducing cumbersome manual data entry and making it simple to navigate websites for quoting, policy servicing, and much more. With deeper functionality, an easier user interface, and available mappings for commonly used websites, HawkLink for Google Chrome is our best HawkLink tool yet!
See HawkLink in ActionWatch our recorded webinar to learn more about HawkLink and watch HawkSoft employees demonstrate how to use it for quoting! |


