Keeping track of insurance application submissions for Commercial Insurance or Workers’ Comp across multiple carriers or brokerages can be a nightmare. Did you know HawkSoft has a built-in Submissions tab on the client file to help you keep track of what’s been submitted, what’s come back, and the status of each submission?
No more searching through attachments and log notes to check on submissions. You can quickly add tracking to any document and put it in a submission group to easily track all submissions for an application at a glance on the client file.
Benefits of submission tracking
- Status tracking: View and track submission status at a glance in a tab on the client file
- Submission groups: Track multiple submissions for a risk within a group
- Auto-documentation: HawkSoft automatically creates log notes and follow-up reminders for submissions
- Submission history: View past submissions on the client’s file for insight into client and carrier behavior
- Track any attachment: It’s not just for applications - you can use this feature to track any attachment on the client file
- Customizable statuses: Use default Sales Pipeline statuses or customize your own
Our Submission Tracking feature is quick and easy to use in HawkSoft. Here’s how it works!
- Start tracking a submission
- Create a submission group
- Enter submission details
- Update submissions
- View submissions
Start tracking a submission
The Submission Tracking feature is great for the ACORD 125 Commercial Insurance Application and the ACORD 130 Workers Comp Insurance Application. But any document on a policy can be attached to a submission, so you can use this feature to track just about anything!
To start tracking a submission, open the policy, right-click on the submitted form or document in the Attachments tab, and select Track Submission. From here you can add it to a submission group and input details about what’s been submitted to the carrier.
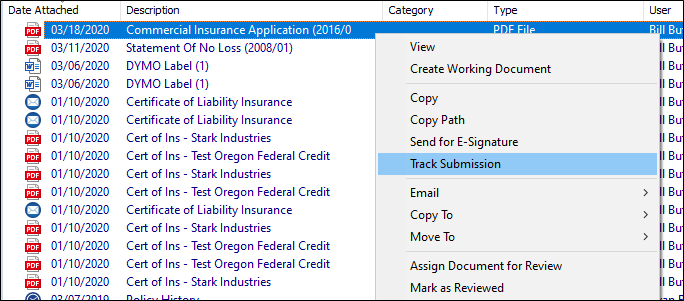
Start tracking a submission from an attachment on the client file
Create a submission group
Submissions can be added to groups so they display together in the Submissions tab on the client file for easy tracking. You can group submissions by policy terms, LOB, or whatever works best for your agency.
For the first submission in a group, select New Submission Group in the dropdown when creating the submission and give the group a name. Enter the date the submissions are expected to be sent back by the carriers. A suspense will be created for this date to help you track the submission. The Proposed Effective Date defaults to the effective date of a prospect policy or the expiration date of an active policy, but can be edited if needed.
You can update the name or dates on a submission group at any time by double clicking on the submission group in the Submissions tab. You can also delete the submission group if needed, but all the submissions must be removed from the group first.
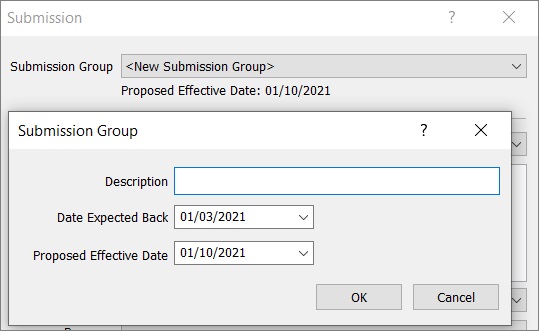
Creating a submission group
Enter submission details
Once you’ve selected the submission group, you’ll enter the submission details. The LOB of the selected policy floods to the Lines of Business table, but you can add or remove LOBs as needed (note: changes to the LOB made here do not change the LOB on the actual policy). Select the Company, Program, and Underwriter the application is being submitted to.
The application document will display in the Documents window at the bottom of the Carrier Submission screen. You can also add attachments, either by searching within the policy attachments or by dragging and dropping a file from your computer, and remove any if necessary.
When you save the submission, you can add a log note with a suspense, which is defaulted to the date indicated on the submission group. This will automatically remind you to check up on the submission at the right time. Follow this process for each submission of the application, assigning them all to the same submission group so you can track them.
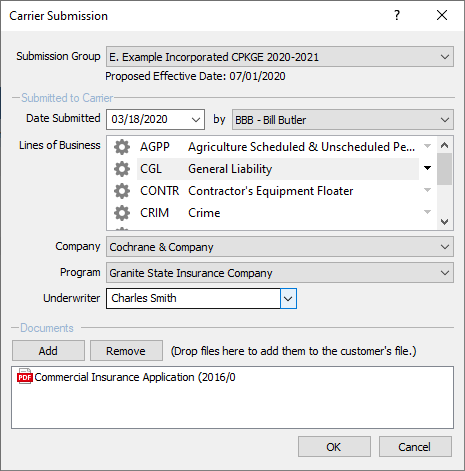
Submission details
Update submissions
Once an application is sent back by the carrier, you can easily update the status of the submission by double clicking on it in the Submissions tab and selecting Edit Submission. Now you’ll update the Received back from Carrier section with the date received, premium amount, new status, and any additional comments or attachments.
See the Track Submissions help article for details on what each of the default submission statuses and sub-statuses mean. If you’d like, you can use your own customized Sales Pipeline statuses instead (learn how in our help article on Sales Pipeline Configuration).
Another log note will be created when you update the submission. Don’t forget to update the prospect policy the application is for, in addition to the submission. You can also delete a submission if needed by double clicking and selecting Delete.
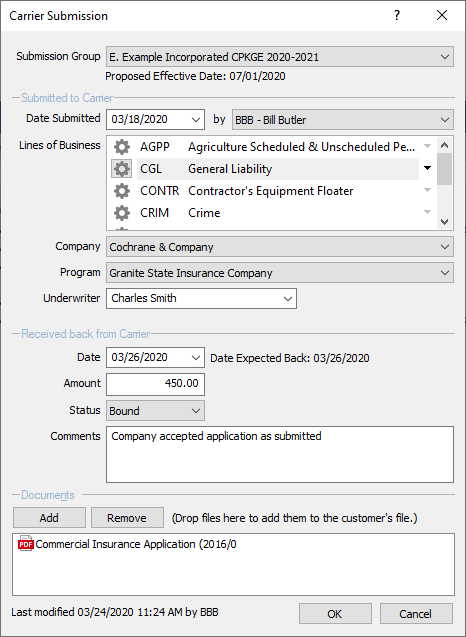
Submission update when received back from carrier
View submissions
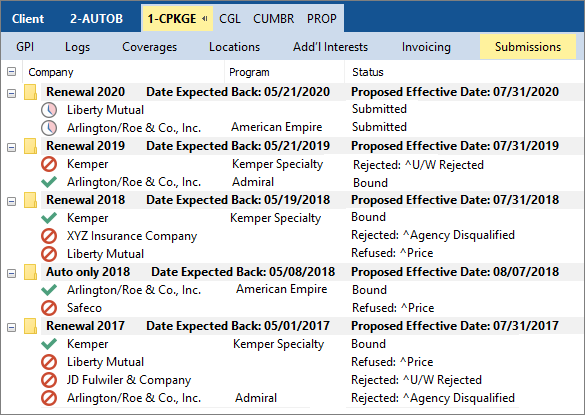
The Submissions tab on the Client/Policy menu bar will show all the submissions on the client file by group (submissions are attached to the client rather than individual policies). You can expand a submission group to see the details for each carrier submission, including its status, date submitted and received back, amount, and underwriter. Symbols next to each submission make it easy to see which ones have been submitted, refused or rejected, and bound.
Even once the policy is bound, the submissions will remain on the Submission tab (unless you prefer to delete them). This allows you to see the submission history for the client’s policy, so that you can glean insights into client and carrier behavior that might be useful for future submissions.

Submissions tab on the client file showing submission groups and status
Get started with Submission Tracking
HawkSoft’s Submission Tracking feature makes it simple to keep track of multiple application submissions and see the status of all submissions without having to dig deep into the client file. Try out this feature today to make tracking submissions easier with HawkSoft!
See Submission Tracking in Action
Watch a training video on Submission Tracking in the Help Portal!

